Wednesday, May 21, 2008

Maiden Voyage!

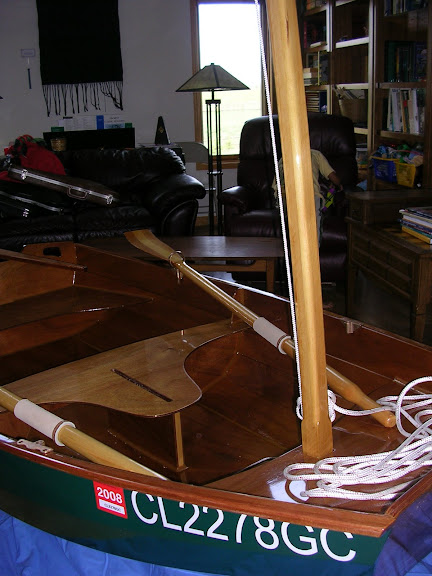
Over a week after finishing her, I finally took Geall out for her maiden voyage and christening. Weather and schedules finally aligned well enough to take her out this afternoon.
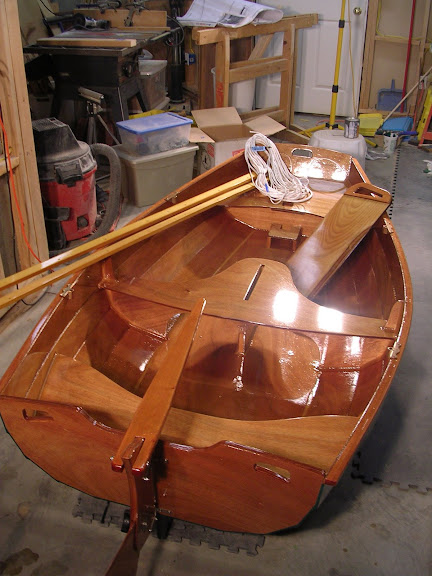
Ready to roll

We went to Boyd Lake, a local reservoir here in northern Colorado. We also took our two tandem kayaks we just bought last year (since all five of our family can't fit in an Eastport Pram at one time).

I put her in the water and to everyone's amazement, she floated! And to no one's amazement, I flailed at using oars for the first time in over ten years. As far as I could tell, she rowed fine (up until a bronze oarlock pin sheared off).

Appeasing Neptune

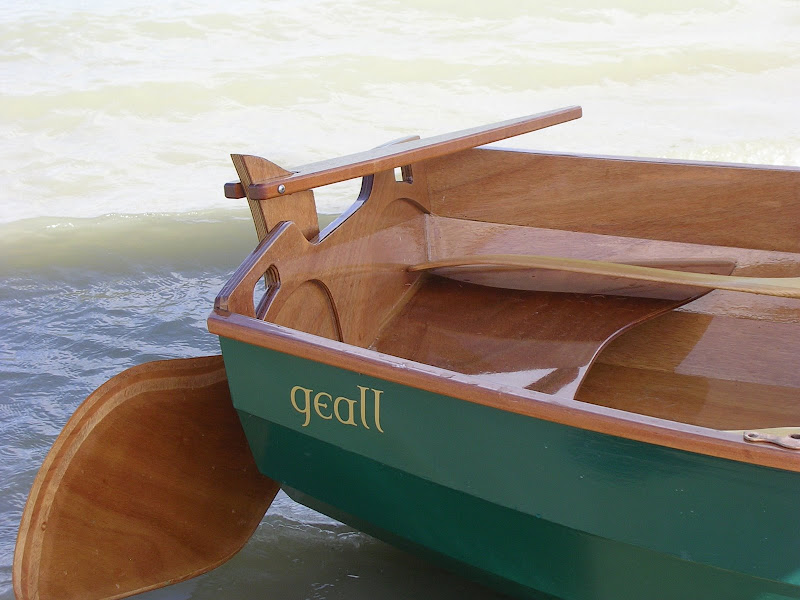
One of the gifts I received at last Sunday's cookout was a small bottle of champagne, perfect for the christening. So I officially christened her "geall" -- Gaelic for "promise" while sacrificing all but a small amount of the bottle to Neptune.
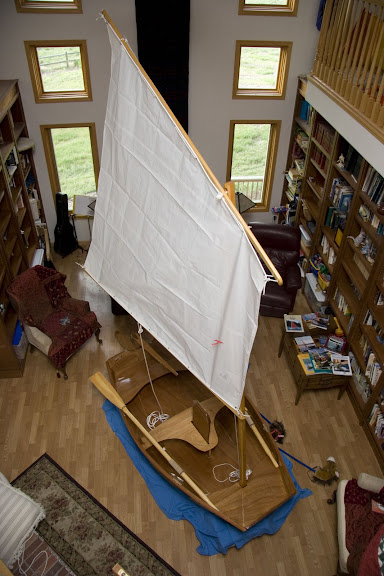
Under sail

I was very pleased with her performance under sail. The winds were variable (this is Colorado, after all), but she always kept moving. It was a during a calm period that I tried rowing with the sail up and that was when the oarlock broke. Sailboats always have to remind me that they are meant to be sailed.

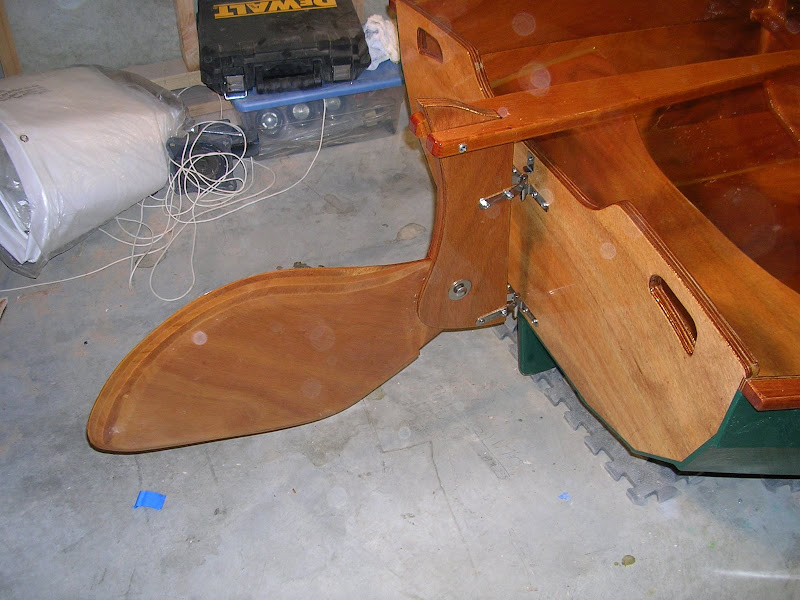
Another mini-crisis occurred when I came into shore for the first time. The kick-up rudder kicked up just fine when it became shallow. When I went to take her out again with my kids aboard I discovered that the knob for tightening the rudder blade had fallen off into the water. Fortunately, my oldest son jumped into the water and found it within 5 minutes. I'm going to have to find a way to keep it attached (and buy a spare).

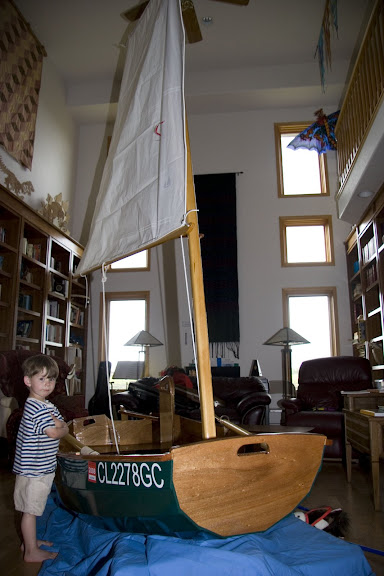
My wife then took my oldest son out and had a blast sailing her. I have been hoping that all of my kids will learn to love sailing her.

All in all, it was a great first sail.

Geall is launched

Sunday, May 18, 2008

A Celebration

Today we had a cookout in honor of the completion of Geall. About 35 people showed up. It was the first time I raised her sails. As a entertaining twist, I displayed her in the library in our house. The cathedral ceiling in that room allowed me to step her 10 foot mast. She rested comfortably on a slew of cushions and a blue bed-sheet.

Indirect lighting makes the varnish look much better

Everyone complemented me on how nice she looked. At this point, I still can only see all of the mistakes I made. Fortunately, most of the mistakes are in the last 10 mils of her skin.

It took me well over a year to build those bookshelves, too

If the weather holds (it was 85 degrees F today), I should be able to christen her this week.

One of the mates inspects my work

Saturday, May 17, 2008

Hardware and Rigging

This last Monday, after the last coat of varnish had dried, I assembled the kick-up rudder and attached it to the transom. Drilling the horizontal hole for the bolt that connects the tiller to the top of the rudder cheeks was more challenging than I first realized. This was due to how wide the tiller was at the point the hole was to be drilled. I didn't want to drill it out in one shot because I was worried that it wouldn't be centered where the drill came out. So I drilled from both sides. I didn't get it perfectly aligned (next boat, next boat, next boat...), so I had to elongate one of the holes. Fortunately it is hidden by the bolt and rudder cheeks.

The newly assembled and attached rudder

Next I attached the oarlocks to the outwales. Earlier this spring I had bought a second set (the first set comes with the kit) when I realized I didn't which rowing position I would use. Having the second position allows me to row it with the mast in, or by myself, from the after position and row it with others on board from the forward position.

The boat was done at this point, but I still had some rigging to do. I drilled holes in the yard for the halyard line and in the boom for the downhaul and the sheet. The manual said to put the downhaul hole in the "gooseneck", but the photos showed it drilled in the boom itself. I decided the latter would be the strongest position. The manual made no mention of how or where to attach the sheet to the boom. I drilled a hole for it about a third of the way from the end. Next, I attached two plastic cleats to the mast, about 10" up from the bottom. I also measured out and cut 15' and 30' lengths (sheet and halyard, respectively) from the 3/8" line I bought last summer.

The completed hull

The following night I laced the sail to the boom and yard using 5mm line I had bought in February. Following the directions, I used the holes I had drilled in the spars prior to varnishing them. The directions were unclear as to how to attach the tack and clew to the boom and the head and peak to the yard. I decided to just tie them to the pre-drilled holes in the spars using a bunt-line hitch, my new favorite knot (from Chapman's Knots). After attaching the downhaul to the boom, I was done!

All that remains now, is to christen it. Alas, the weather and personal circumstances have not allowed me to do it yet. Tomorrow is the cook out, so I'll have to show off a unchristened boat.

Wednesday, May 14, 2008

Varnishing the Interior

It was now time for the most visible effort I was going to make - varnishing the interior. As I've mentioned, I hope I've learned some lessons from this to make the next boat go even better. I'm not sure I could have learned these lessons any other way, however.

I had also put some time pressure on myself: It was now the end of April and I wanted to have to pram ready by the time warm weather in Colorado arrived. Also, I set a date to have a cook-out at our house where the guest of honor would be the Pram! The date of the cook-out would be May 18. I started varnishing the interior on May 9. Since I started on the week-end, and since the varnish I was using (Schooner by Interlux) could be reapplied in 12 hours, I was hoping I could varnish and sand on the same day. This proved to be true, although varnishing took over two hours and wet-sanding took over an hour.

The first coat went on pretty well. I realized that planning the varnishing was going to take some work. I was using the varnishing technique described on the CLC website, namely using a foam brush, applying in one direction and then going back over it in the perpendicular direction, always going from "dry" to "wet". This works great in a small patch, or where an adjoining section will be completed soon enough where you can blend the two sections together before the first begins to get tacky. And that was true of the exterior transoms. But what about the interior bottom? It was too big to do as a single section. I wound up doing a quarter of the bottom at a time, going around counter-clockwise. Unfortunately, by the time I did the fourth section, the first section had begun to set and it was impossible to join the two without leaving brushmarks or a double-thickness of varnish. This is a problem I never did figure out a complete solution to. I suspect I needed to thin the varnish even more than the 10% I was doing. Of course, that has drawbacks too: runs on the vertical surfaces would be even harder to control. I don't know what the right answer is other that using a sprayer and spray booth (I have the former, but not the latter).

I also managed to nearly drive us out of the house after the second coat. Up to the second varnish coat, I had always varnished right before bedtime. By the morning, the odor in the house wasn't too bad (have I mentioned I was building and finishing in my basement?). I had also installed a ventilation fan in my shop that vented directly outside. The second coat, however, went on in the early afternoon. It had also gotten cold outside, meaning closed windows and a running furnace. My wife was really regretting getting me this boat at this point. Luckily I had only one more coat to go and I put it on a night.

The second coat had developed a problem, however, that I hadn't seen before: It had many tiny hairs or threads embedded in it. If I didn't figure out what caused it I was in danger or ruining my third and final coat. What was strange, was the mast, which I had varnished immediately prior to interior, showed no signs of this problem. Before I started the last coat, I switched back to a shop cloth that had worked earlier. I was fastidious in wiping down the boat after the final wet-sanding.

After two coats of varnish

So, with much trepidation, I began the last coat. The first section went well, no sign of the evil threads. Then, on the second, adjoining section, they reappeared! At this point I realized the problem. Immediately prior to the thread appearing, I had just varnished underneath the mast step, a place that was very difficult to reach. I must have missed wiping the sanding debris out of there. I quickly tossed the brush and grabbed a new one. Problem solved. Every time after that when I started seeing anything suspicious in in the varnish, I replaced the brush.

In the end there were only a couple of mistakes in the final coat: a spot on the middle seat that I didn't apply enough varnish that didn't blend well when I went back over it and a sag on an upper (near vertical) panel. I consoled myself by saying I could always sand and recoat at any time.

After three coats of varnish

Almost done! I just had to assemble and attach the rudder, attach the oarlocks, and rig the sail.

Thursday, May 08, 2008

Painting the Hull

I spent seven days painting the hull:

Day 1: Mask the varnished transoms, paint on the primer. Wait 24 hours.
Day 2: Sand the primer
Day 3: First coat of polyurethane. Wait 24 hours.
Day 4: Wet sand the first coat.
Day 5: Second coat of polyurethane. Wait 24 hours.
Day 6: Wet sand the second coat.
Day 7: Third coat of polyurethane.

With each subsequent coat of primer/pain, as I sanded them, I realized how hard it is to try to fix existing flaws in the finish by putting new layers on top of them. First, it's really hard to sand the last layer smooth enough and evenly enough to hide the flaws. Secondly, each new layer adds new flaws. As I mentioned, I think the right answer is to start with as smooth a surface as possible. It would have meant adding additional layers of epoxy before varnishing or painting. As I discovered with surfaces of the seats, sanding the 2nd layer of epoxy almost back down to the wood and then adding a 3rd layer (which is then sanded smooth) leads to a very smooth and consistent surface. Oh well, next boat.

I've now officially given up on having a mirror-smooth finish and have now settled for one that isn't too embarrassing to have other people look at.

After two coats of paint

Varnishing

Next, I flipped the boat over again and started varnishing the outside of the transoms. At the same time I began varnishing the rudder, daggerboard and spars. I started out by varnishing one face at a time of the rudder parts, boom and mast. I varnished them face-up. This quickly became a mess because of drips running down to the bottom face. I decided to hang them vertically and do all sides at once. The spars I hung horizontally. This made varnishing more difficult, but resulted in less clean-up work. The first time I sanded between coats, I used dry-sand paper but it seemed to leave pretty big scratches and remove most of the varnish. I then bought a bunch of wet-sand sandpaper, 330 and 400 grit. After sanding each coat, I wiped down with alcohol.

I used the rudder blade and cheeks as practice. I think I wound up with 4 coats of varnish on those before I found the finish acceptable. The daggerboard had 3 or 4 coats (I lost track with the whole varnish, sand, varnish, sand... process). I gave the tiller handle 6 coats and the boom and yard 5 coats (none of which where epoxy-coated).

After enough practice I proceeded to varnish the transoms. I gave them 3 coats and, except for one sag, I think they turned out OK. At this point I still hadn't realized the error of my ways with regard to sanding.

Bow transom after three coats of varnish

The daggerboard after 3 coats of varnish

Mast after four coats of varnish

Epoxy Sanding

Once the epoxy had hardened, it was time to sand in preparation for varnishing and painted. My plan all along was to varnish all of the interior and the exterior of the transoms. The rest of the exterior would be painted in a dark green color to match the hull color of our Potter 19, "Promise".

Of all the steps in building the pram, this is the one I underestimated the importance of getting right. I had assumed that any flaws with the epoxy coating that sanding didn't remove would be taken care of by either the paint primer or by multiple coats of varnish. While this was true for the smaller imperfections, it wasn't true for the larger blemishes, such as drips and runs in the epoxy or where fiberglassing had gotten "wavy". In hindsight, I see that I should have spent more time sanding to a uniform level. This would have resulted in sanding through the epoxy in spots (which happened anyway), but I should have been not afraid to add more epoxy coats and re-sanded those. In short, I should not have considered epoxy coating and sanding as separate steps, rather as a single effort to produce an absolutely smooth and even, fully sealed surface ready for paint or varnish.

But I didn't realize this until I started painting and varnishing. Oh well. Next boat.

I started with the interior (since it was what I just finished epoxy coating). For the first time, I used my random-orbit sander (connected to my shop vac). As I feared, it resulted in my sanding through the epoxy to wood or fiberglass in spots. I could only use the sander on the bottom of the inside and on the seats. I did wind up recoating the seats and the bottom with more epoxy. Those were the surfaces that turned out the best - I just wish I had recoated more places. Also, I didn't re-sand with the sander, opting to hand sand the recoated surfaces. I think this was a mistake. The sander did a much better job. I was just too afraid of sanding too much. Instead, I sanded too little.

Eventually, I got it tolerable enough and flipped the boat over to sand the exterior.

The exterior was a similar story, except I did use the sander for the first pass (150 grit). I sanded through the epoxy in spots at the edges of the laps. I recoated, but here I made another big mistake. I only recoated the edges where I had sanded through. I should have recoated the entire exterior again and resanded with the power sander. But I didn't and wound up having an uneven surface on the outside of the panels. At this point I was still assuming that the primer and paint would cover this up.

The interior, after sanding epoxy coats

Wednesday, April 16, 2008

Epoxy Coats

Sigh. Still way behind on the blog. I'm writing about things that happened weeks ago. It would be better to write about what I did each day on the day I did it. Unfortunately, lately I've working on the boat after work and after my wife and I get the kids to bed. When I'm done, I'm so tired it's all I can do to crawl into bed.

Anyway....

After all the sanding, next up was to add two coats of unthickened epoxy.

I started on the bottom, with the hull upside-down. I used a small foam roller and a small disposable paint tray. I wound up reusing the tray (but not the rollers). As usual when starting a new phase, I was a little nervous about glopping epoxy over my boat but as I got going it went smoothly. After I rolled on the epoxy, I went back over it with a 2" foam brush to remove any bubbles. I was paranoid about drips - especially on the skeg and the near-vertical panels near the sheer line. So after each coat I hovered with the foam brush. As I mentioned before, I decided not to do anything special with the first coat on bare wood. I just put on a thin coat and it looked no worse than using the scraper technique - and it wasted less epoxy. After the first coat hardened, it took me a few days to get back to working on the boat so I had to lightly sand it first. After the second coat, it appeared I had completely filled the weave of the fiberglass on the bottom.

The bottom after one coat of epoxy

Next, I flipped the boat over and worked on the inside. It was pretty much the same drill. One coat followed by a light sanding (and wiping) and a second coat. This time, I got both coats on in sequential days, so the sanding wasn't as crucial as before. Of course, working on the inside was more difficult and time-consuming due to all of the seats and bulkheads. It was especially tricky getting all of the dust out of the longitudinal joints where the panels met. Like the bottom, it looked like I filled the weave of the fiberglass with the second coat of epoxy (actually the third coat for fiberglassed sections).

The interior after two coats of epoxy

Also, during this time, I added epoxy coats to the daggerboard.


The daggerboard after epoxy coating

Now it was time to sand off most of the epoxy I just added.

Preliminary Sanding

(It's been a while since I've updated the blog. Fortunately, this time, it wasn't because I wasn't working on the boat - I just wasn't working on the blog).

Once I got done with filling holes, it was time to start sanding in preparation for the epoxy coats. The bare wood needed sanding to remove scratches and the odd drips of stray epoxy. The fillets needed sanding to smooth them out. And finally, the fiberglassed sections needed sanding to allow epoxy to adhere to them.

I started on the bottom, with the boat upside-down. It was tedious, but certainly not difficult. I hand sanded it because it was easy enough and to avoid sanding through the top plies. I started with (bulk purchased) 80 grit, moved my way into 150 grit and ended with 240 grid sandpaper.

The outside, after sanding.

I then flipped the boat over and started working on the inside. This was more tedious (and not because I was hand sanding) - there were a lot of fiddly bits to worry about: bulkheads, under the seats, etc. It was also time to deal with the large divot I put into one of the panels on the inside when the boat slipped off one of its sawhorses. I used a trick I read about in "How to Build Glued -Lapstrake Wooden Boats" by John Brooks and Ruth Ann Hill. He recommended placing a wet paper towel over the gouge and then placing a very hot iron over it. The iron causes the water to turn into steam which re-expands the crushed wood fibers. I worked extremely well, athough there will alway be a mark in that spot. But no putty or extra epoxy filler would be required.

The inside, after sanding.

At the end of the second day of sanding, the boat was ready for epoxy.

During this time, I began epoxy coating the kick-up rudder. I used the same technique for the first coat that I used for the seat bottoms: 30 minutes after putting the epoxy on, I scraped off all of the excess. After the first coat had hardened, I lightly sanded and added the 2nd coat. I have to admit that I was underwhelmed by the resulting finish. I guess I was expecting too much, something approaching a smooth varnished look. The epoxy surface was not perfectly smooth. There were bubbles (or dust) in it. Its thickness wasn't uniform. After doing this I questioned the value of scraping back the first coat.

The rudder pieces, after the 2nd coat of epoxy.

Sunday, February 10, 2008

The Last of Thickened Epoxy?

Well, today, I think I'm done dealing with thickened epoxy. I faired (puttied) some gaps between the panels at the transoms. I used epoxy thickened with microlight to peanut-butter consistency. It was "creamy" peanut butter, and I should have made it "chunky" since it sagged a little, but it worked.


Above, is my usual gung-ho masking job. Below is the freshly applied fairing. Note how light the mixture is using just microlight.


After that, I worked on the mast. I drilled a 1" diameter hole centered 1.5" from the top of the 10 foot spar. I rounded the edges of the hole using the 1/4" round-over bit in my router.

Next I put a 1/2" round-over bit in the router and did the four corners of the mast, stopping 10" from the bottom (so the mast step can keep it from twisting).


It went OK, except that the wood started to splinter pretty badly when I ran the router in the "correct" direction. That is, against the direction the bit was trying to pull the router. This is normally the preferred direction, but for some reason it was really tearing up the wood. By the time I realized how bad it was, I had a 3" long, 1/4" deep gouge in one corner of the mast. I probably should have done the round-over operation in two passes, using the 1/4" bit to start.

Score another one for impatience.